

How To Strip Oil Painted Canvas
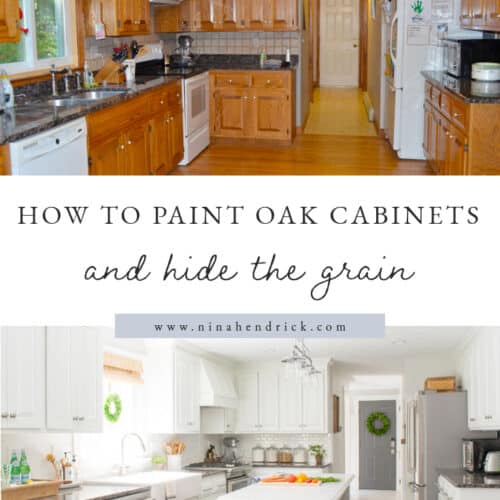
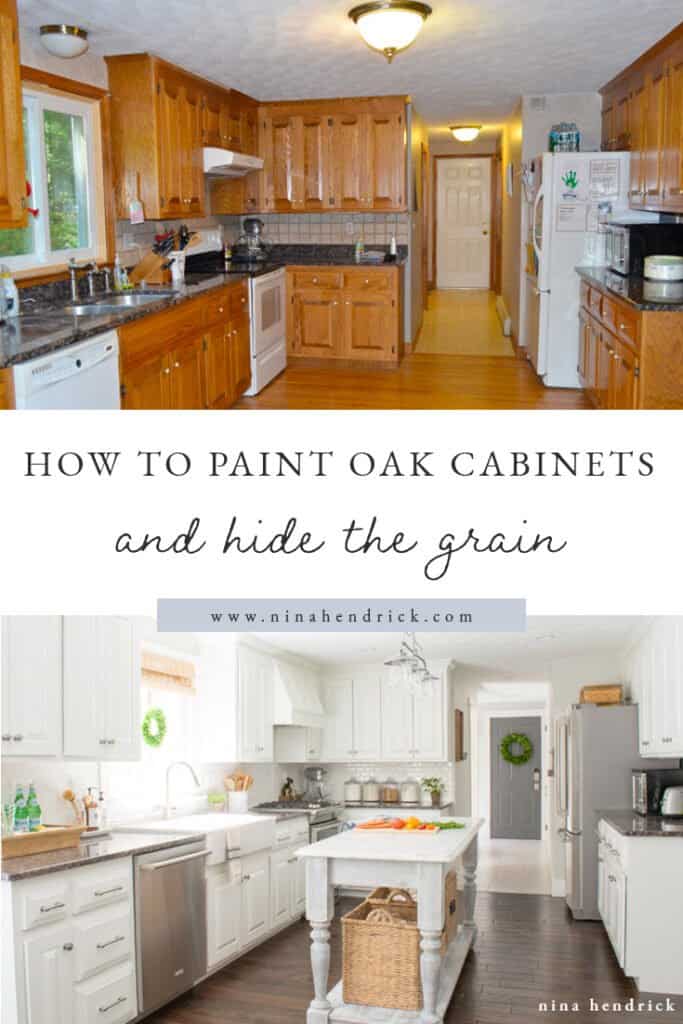
Learn about our proven process for how to paint oak cabinets and hide the grain to accomplish a completely smoothen and professional person finish.
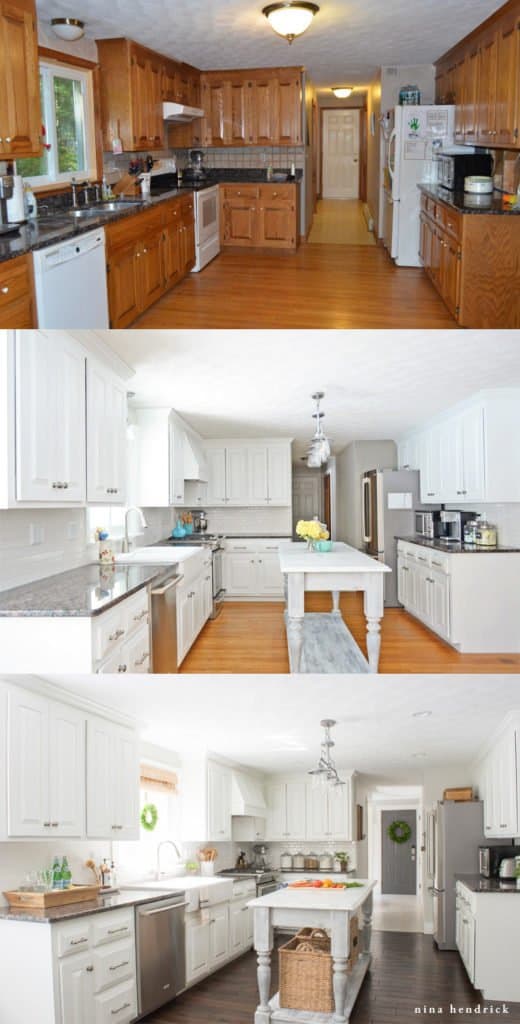
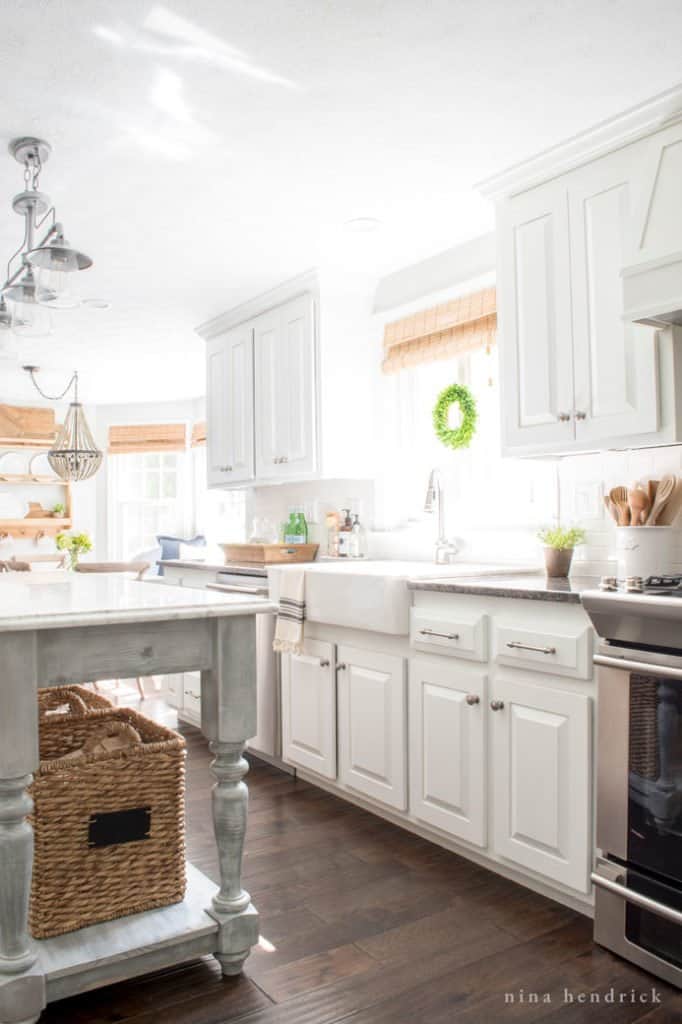
In the past, I've talked about how to paint a room, my favorite room painting essentials, some of my get-to paint colors, and how to choose a cohesive whole house color palette. Today I'grand going to share my updated tutorial for how to paint oak cabinets and hide the grain. We successfully completed this project and painted our oak cabinets white over five years ago to achieve a smoothen end.
How to Paint Oak Cabinets and Hide the Grain
Originally Published on February 16, 2014. Final updated May fourteen, 2020.
What to Know Before You Begin Your Project
While the results speak for themselves, I will be very frank upfront: this project was not quick, nor was it an easy one. I wanted a professional await that would buy us years to salvage up for a full kitchen remodel. I was not looking for a quick solution. If y'all're also willing to put in the hard work, this may just be your answer to having a beautiful kitchen within a reasonable upkeep!
Executing the project too requires a time commitment. For an boilerplate-sized 150 square foot North American kitchen, should you lot choose to do it all at once, my estimate is about five days. If you choose weekends, it will probably take yous virtually a month.
I certainly don't mean to scare you lot off, I merely want you to know that this isn't a "Paint Your Kitchen Quickly and Hands!" tutorial. This one is for the perfectionists who aren't afraid of a little a lot of elbow grease. Merely judge what? If I bought a house tomorrow that had orange oak, I would practise it all again! The results definitely validated the hard work.
When I set out to do this project over six years ago, at that place weren't many resources to exist constitute on doing a project like this, although countless take popped upwardly since, every bit white cabinets became the norm. I spent many months reading the tutorials I could find, which were more in the "quick and like shooting fish in a barrel" category or didn't include covering oak grain.
Mostly, I combed through forums for professional painters! I tested many of the products and processes they mentioned, including one-half a dozen wood/grain fillers, oil-based paints, latex-based paints, lacquers, other enamels, cans of spray pigment, chalk paint… the list goes on.
I created a bunch of test swatches, compared them, watched how the paint reacted over fourth dimension, primarily whether it became yellowed or if the grain showed upwards. In the terminate, I was happiest with the results of the process I'm well-nigh to share with you, which I constitute practically by accident. I promise that all of my enquiry volition help yous as much equally it helped me!
How to Paint Oak Cabinets EBook
While this tutorial weblog post will ever exist free, this project was absolutely a beast . Frankly, I feel like it's too much data for 1 blog post, and you'll observe other follow up posts linked below.
If you're looking for the entire project conveniently organized in one spot, the ebook is your best bet. It includes an in-depth caption of what didn't work, all the frequently asked questions, a upkeep breakup, a printable shopping checklist, a review of how the cabinets held up later v years, and much more than.
A Quick Disclaimer
My husband and I were already experienced painters when we gear up out to do this project. In our opinion, information technology's not a beginner's projection. If you are just starting out at DIY, nosotros recommend that you speak to a professional most painting your cabinets. We cannot guarantee the result of your project. As with all projects, we recommend that you lot e'er use proper prophylactic equipment and proper ventilation for paint projects.
I chose and recommended the products I felt were all-time through research and trial-and-fault. There were no sponsors at that fourth dimension, I chose every product independently. Nevertheless, this postal service contains affiliate links, then I make a modest committee if you cull to buy your supplies through my links (at no extra cost to you). Read my disclosure hither for more than information.
Oak Cabinet Painting Questions Answered
How Do You Hide the Grain on Painted Oak Cabinets?
You can hide the grain on oak cabinets with a thin layer of Drydex wall spackle. I become through the process of exactly how it works in the tutorial below. Earlier we swoop in, there's 1 thing I really want to emphasize. I truly feel that filling in the grain is what made this projection so successful.I know that step is the hardest. All the same, on our test pieces that didn't have filler we were left with black grain either afterwards several coats or the grain emerged over time.
Why did y'all use Drydex as a grain filler?
We tried several products, including many actual wood and grain fillers, merely we got the all-time results with the Drydex wall spackle mixed with a little of the dust that remained on the cabinets from the kickoff sanding. I know it sounds strange, but it worked great.
With that being said, please know that this isn't a magic production. Y'all'll still see an extremely subtle grain at certain angles on the finished product, just enough grain to know information technology is wood under there. Nosotros weren't aiming for a glasslike stop. Nosotros just knew from previous experiences painting oak that the grain item sometimes remains black because the paint can't go far into the tiny cracks. Nosotros definitely wanted to avoid grain showing through completely, and this solved our problem!
What kind of paint practice yous apply on oak cabinets?
The all-time paint for oak cabinets I found is Insl-X Chiffonier Coat Enamel in satin diluted and applied with a paint sprayer. Like I mentioned above, a lot of research and testing went into that determination.
Insl-Ten Chiffonier Coat is an acrylic water-based enamel. It was already pretty thin, but through trial and error, we determined that we achieved the best results with our item paint sprayer when we diluted information technology 8% with distilled water. The amount may vary depending on the sprayer you use, merely no affair what we are being very specific nigh distilled h2o. We tried it with tap water and the minerals in our h2o reacted negatively to make the paint discolor and run. To reach the right per centum, that is where a measuring cup (and probably a calculator) will come in handy! Mix it well and record the dilution so that you can mix future dilutions to match.
My favorite attribute of Cabinet Coat, and the reason why I recommend it and then highly, is that it has really great self-leveling properties. It has provided the closest matter I've seen to a cabinet manufacturing plant finish.
It too never chipped or yellowed within the v years later the projection (with the exception of chipping on a spot where the cabinet had rotted beforehand). You can read the v-year review here if y'all're curious well-nigh the longevity of the terminate! Overall, I was hoping for 3-5 years to save up for a full remodel, and the finish more than met the challenge.
Should I utilize a paint sprayer on my oak cabinets?
Aye, I highly recommend using some type of pigment sprayer.
We take gone dorsum and forth and tried a few different paint sprayers during the years since nosotros completed this project. Nosotros struggled with some "orange peel" (air bubbles in the paint) in the early on steps of this project but were able to correct information technology with the proper dilution. At this indicate, I would recommend the updated version of the original paint sprayer we used.
What is the best color to paint oak kitchen cabinets? Can I choose colors other than white?
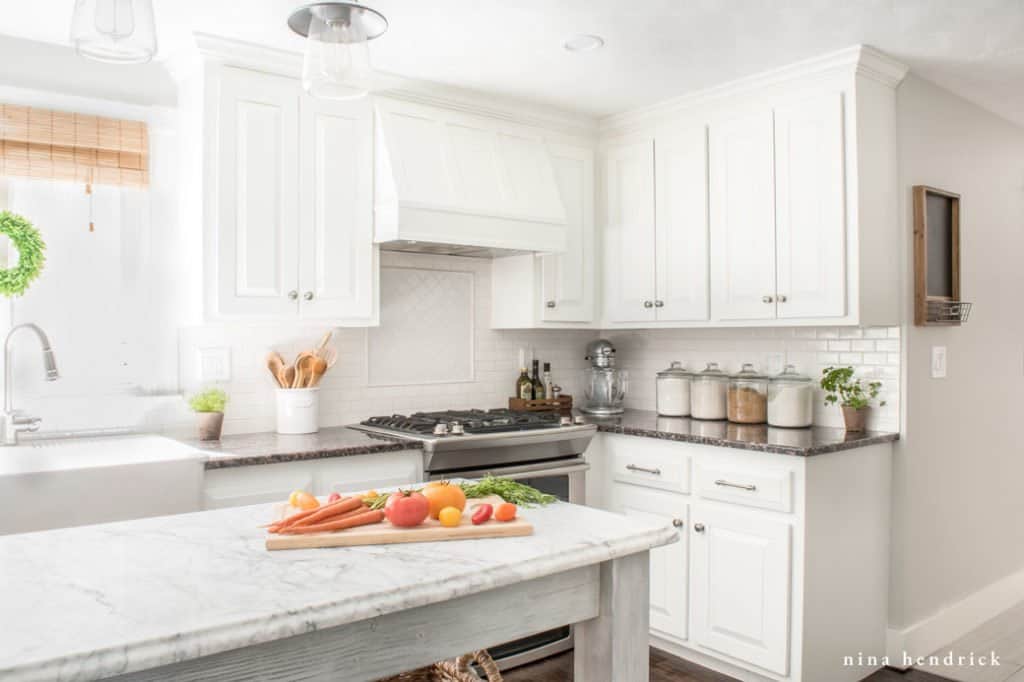
Of course, this function will be up to y'all, but I clearly chose a timeless white! With that beingness said, this tutorial works for any paint color, since the Cabinet Coat tin be tinted. I didn't realize this, so it'due south just direct from the tin can. If I could exercise it all over again, I would tint it Benjamin Moore Simply White to match our trim, ceilings, and other built-ins.
In its natural state, Insl-X Chiffonier Coat seems to have an ever-so-slight blue undertone. Go on this in mind if y'all are hoping for a warmer color. It's best to talk to your local paint store skilful and see what they recommend.
Did You Add a Top Coat?
We did not, because Insl-Ten doesn't recommend a topcoat. We did apply polyacrylic to the flat surfaces within the cabinets to protect the shelves. I never added a superlative coat to the cabinet faces and the finish was still undamaged 5 years subsequently.
Other Considerations in Our Kitchen Remodel
We had additions to this projection that you may or may not have to worry about. These didn't factor into my guess of this project taking v days in total.
Here was a list of our cabinet to-dos:
- Nosotros had to add trim pieces to the doors to adapt the new hidden hinges. You tin read more most that process here!
- Our previous shelves were warped fiberboard and were covered in shelf-liner, so we opted to replace them and built cabinet-grade plywood shelves.
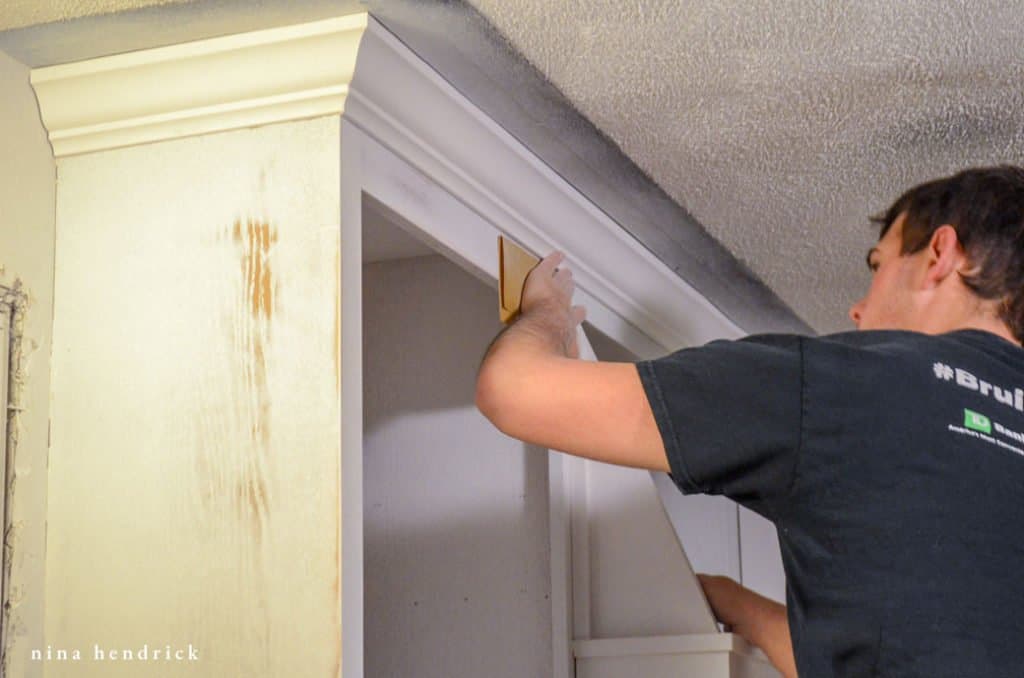
- We added crown molding.
- We had to do some carpentry to fix and reinforce the sink cabinet to back up our new Farmhouse sink.
- Some of the cabinets were damaged and sagging, and so nosotros also had to reinforce them. They're not solid wood all of the way through and are made partially from fiberboard.
- Nosotros built a custom range vent encompass with hidden storage.
In one case we accomplished all of these tasks, we could finally commencement on the painting procedure. One time y'all get to the painting, it moves very quickly! Unfortunately, you're in for a long process before that happy step. I hope it's all worth it in the end!
Project Tools & Materials for Painting Oak Cabinets
Tools
- Orbital Sander
- Step Ladder
- Shop-Vac with Castor Attachment
- 1 1/4″ Putty Knife
- iii″ Putty Knife
- 2″ Paint Brush
- Mini Roller Kit
- Paint Measuring Loving cup
- Pigment Sprayer
- Air Compressor (optional— for spraying dust off cabinet doors and drawers)
- Caulking Gun (optional)
Materials
- TSP Substitute
- Painter's Record
- Plastic Sheeting
- lxxx-Dust Sandpaper Discs
- fourscore-Grit Sanding Block
- 220-Grit Sanding Discs
- 220-Grit Sanding Cake
- 320-Dust Sanding Cake
- Drydex Wall Spackle
- Oil-Based Primer
- Insl-X Cabinet Glaze Paint
- Distilled Water
- Caulk (optional)
How to Pigment Oak Cabinets and Hide the Grain Footstep-By-Footstep Tutorial
Step One: Assemble Your Supplies
Make sure you get together everything from the listing in a higher place. Trust me that you won't exist wanting to make a trip to the hardware store partway through the project!
Step Ii: Remove Everything from the Room
I mean everything. At that place will exist a lot of dust created! You will want to completely clean out your cabinets, junk drawers, everything. This was a practiced opportunity for me to employ some tough-love and get rid of the kitchen utensils and items that have never been used. This process alone can take you quite a while, depending on how disorganized you are (and I was very disorganized!).
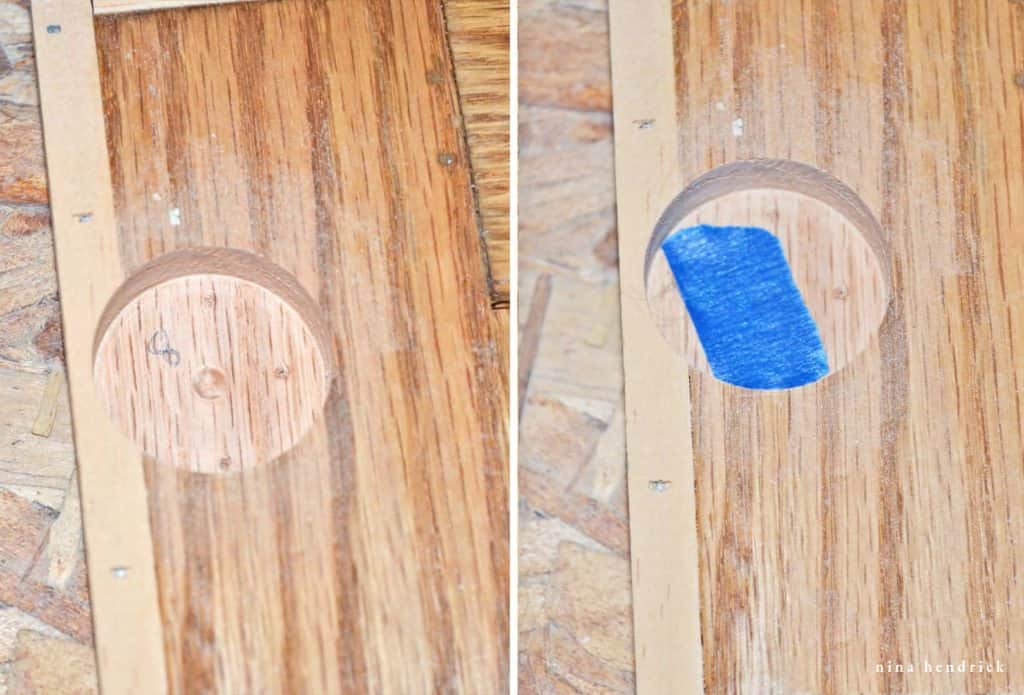
Stride Three: Remove and Number Doors & Drawers
If you're saving hardware, make sure to place it in baggies or envelopes with respective numbers. We were replacing the contumely/porcelain hardware, so we skipped this step. Even so, we still made certain to number our doors and drawers, since we have custom-built cabinetry (built in place versus individual pre-built cabinets) each door is slightly different in size. No matter what, it's a good idea to number everything, only in case.
Step Four: Vacuum Cabinet Boxes and Wipe Downwards with TSP Substitute
You'll want to brand sure that in that location'due south no grit or dirt in or on any of the cabinets because it volition impact your eventual finish. Vacuum everything. You can probably utilise your regular vacuum for this office if you wish. And then wipe downwards with TSP substitute. Since we were living in the house while renovating, we wanted to avoid actual TSP. The substitute is a good alternative, but it is notwithstanding a chemical, and then make sure to have proper ventilation while you use information technology.
Footstep 5: Remove All of the Appliances
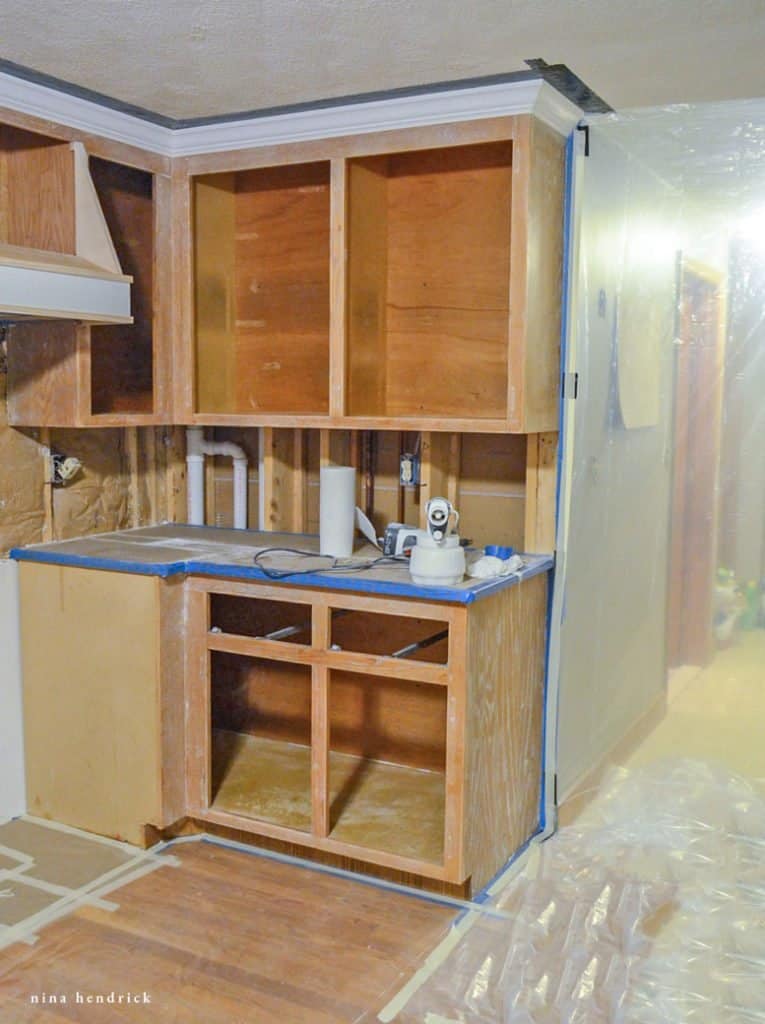
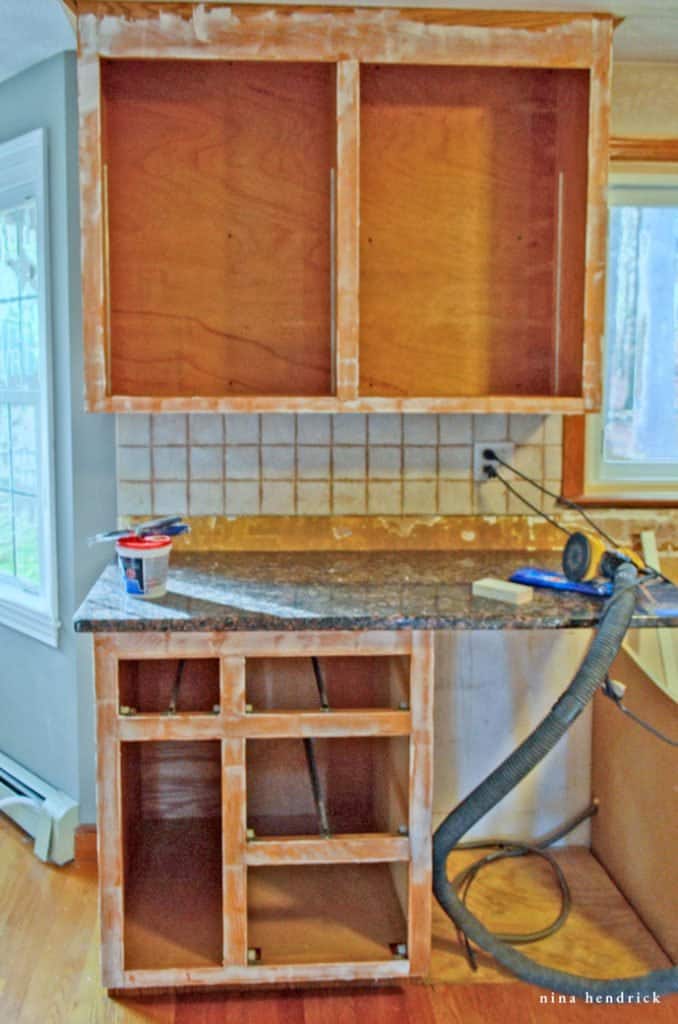
To get an all-over stop, information technology'south best to remove your appliances and put them out of impairment'southward way. This means out of the room completely. Nosotros tried to delay this stride as long equally possible to keep our kitchen functional.
Step Six: Seal Off Your Kitchen
As mentioned in Stride 2, there will be A LOT of dust… and too overspray. You'll desire to seal off every opening to other rooms, and completely cover your floors and walls with plastic. You lot'll also want to protect your countertops. Anything that you don't want permanent specks of white paint on, cover it up! Yous'll probably end upwardly with a plastic room past the time you're done! Since we have the textured plaster ceiling, we had to attach the plastic sheeting to the ceiling using Gorilla Record, since the painter's tape wouldn't concord.
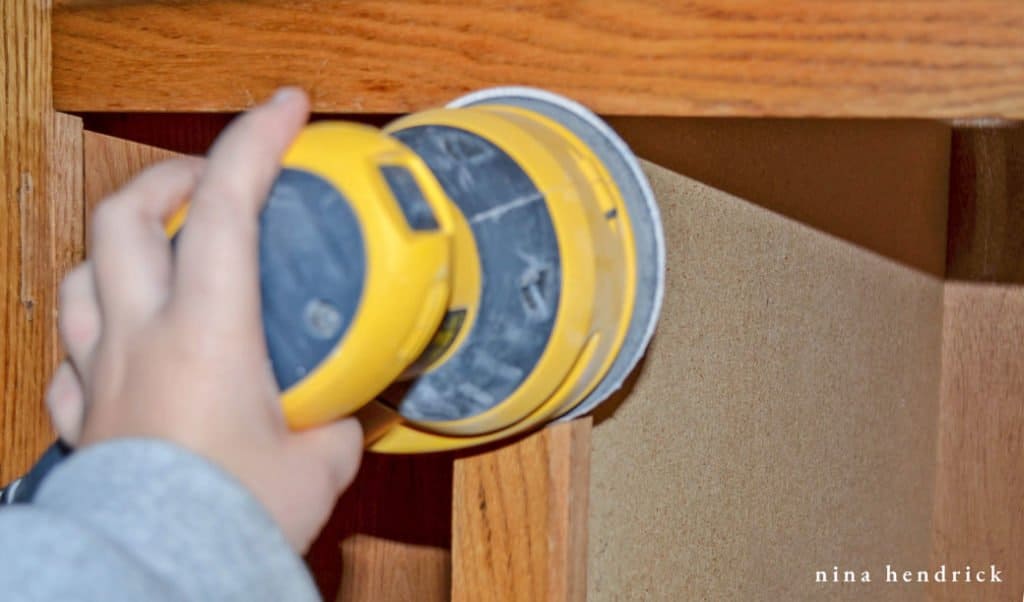
Stride Vii: Sand Cabinet Faces with 80 Grit Sandpaper
We attached our orbital sander to our shop vac to effort to minimize the dust affect on the room as a whole. We focused on damaged areas (there were many, especially under the old hinges and around the sink). It's okay to leave some dust behind on the cabinet faces, since information technology's actually helpful in the next step.
Stride 8: Fill in Grain and Imperfections with DryDex and a Putty Knife
Y'all only demand a thin layer of DryDex, but enough to cover the grain. If y'all use too much, you will just create more sanding for yourself in the next step (speaking from experience!). Areas with impairment or spiral holes (like in our case, where the exposed hinges used to be) may require a calorie-free second coat of Drydex. Permit for the recommended drying time in between sanding and coats, or else it will pill up and get ineffective.
Step 9: Sand with 220 Grit Sandpaper
Utilise your orbital sander fastened to your shop vac. This time y'all don't want to leave any grit backside any. Go around with a tack cloth and wipe everything downward (Don't use a damp cloth. It will remove the Drydex from the grain).
Step Ten: Primer
You lot're getting there! This is much less of a job if you are only doing your cabinet faces and ends. Nosotros opted to paint the inside of the cabinets as well (there were a lot of stains and damage) and so I used a mini roller and a brush and Kilz Original Primer to become the task washed.
It's important to use an oil-based primer considering of the tannin in the oak. Tannin is an orangey-brown oil that will drain through if you employ a water-based primer. We were told that the Cabinet Coat included primer. It does, which works out slap-up on maple or pino, only on our oak examination swatch nosotros concluded up with swirls of tannin without the primer.
Footstep Eleven: Sand with 320 Grit Sandpaper
Do y'all love sanding yet? By this point, sanding is your all-time friend (HA!). Sand it all down lightly by paw, considering the orbital sander will remove too much of the primer. I recommend a sanding cake. Trust me, throughout this project, I tested all options. The sanding cake is much easier to concur than regular sandpaper. Then vacuum up all of the grit with a brush shop-vac attachment, and run the tack cloth over it again for skilful measure.
Stride Twelve: Primer Again
We learned that it is much easier to become the desired coverage when you create a more often than not solid white canvas for the final coat of paint. Really, the primer is your workhorse in this project (well, other than yous, that is!). Repeat the steps higher up until you lot experience satisfied that the cabinets are white.
Step Thirteen: Prep Doors & Drawers
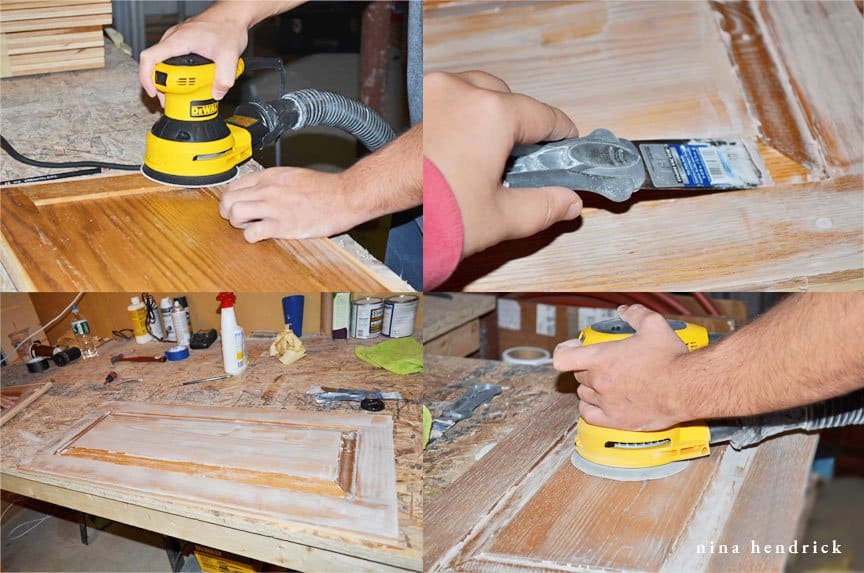
Find a large apartment expanse and repeat Steps seven-12 on your doors and drawer faces. The sanding blocks I recommended are too for this pace since an orbital sander won't go into the door detail.
While using your Drydex, I recommend using a smaller putty knife to get into the item, if your door or drawer has routed areas.
This is the step where the two optional items on the Materials List come into play- the air compressor and the Kilz Spray Primer. After sanding in betwixt coats it is faster to spray the details with the air compressor to remove dust (rather than using a tack cloth). If you already happen to ain one, it'south convenient- only it isn't necessary to go out and purchase one for this project.
Additionally, if you lot accept a space for spraying primer and proper ventilation, it is much quicker to use the cans of spray primer on your doors and drawers. We happened to take admission to a professional person spray berth, so nosotros brought the drawers and doors in that location and sprayed the primer on. Information technology definitely got the details better than a brush. It was and so much faster, simply more than plush every bit nosotros went through at least a dozen cans of spray. As with any project make sure you are wearing a rubber mask when spraying with aerosol!
Footstep 14: Caulk all Cracks and Detail (Optional)
My biggest mistake when nosotros did the project was that I saved this step for last. Five years after, the pigment never yellowed, only the caulking did. Larn from my mistake, make sure to caulk before doing the final coat of pigment!
I should also mention that this stride isn't required. Wood expands and contracts, which may cause the caulk to fissure. After speaking with a local custom chiffonier maker, they don't caulk all of the seams for this reason.
Step Xv: Prep your Pigment & Paint Sprayer
As mentioned earlier, you will need to dilute the Cabinet Coat with distilled water. Information technology'due south all-time to follow the dilution instructions with your paint sprayer, merely it may require even more tweaking. This is where your measuring cup comes in handy! Keep rail of how much distilled water yous're adding. Once you figure out the right dilution, make note of it so y'all tin can dilute the refills properly!
Step Xvi: Test the Sprayer
Whatever y'all do, don't immediately point your sprayer at the cabinets and begin spraying. Fifty-fifty afterwards each refill, apply a test board (nosotros used an extra leftover slice of drywall) to make sure that your aligning is right on your paint sprayer.
Stride Seventeen: Paint Cabinet Boxes with Sprayer
Important Tip: Paint modest areas and tough angles showtime!
An case of a tough area is the dorsum of the face frame inside of the cabinet. It'south always easier to fill in a big flat area than to risk overcoating tough to accomplish spots. Retrieve, if you overcoat, that means you take to sand once more. :) Those awkward angles also become even more difficult to paint if you're avoiding already wet surfaces.
The best technique is to motility the sprayer continuously with smooth, long strokes. The nozzle of the sprayer tin exist rotated for horizontal or vertical strokes, depending on the direction of the surface you're painting. We did ii coats on the cabinet boxes, with enough of drying fourth dimension between coats.
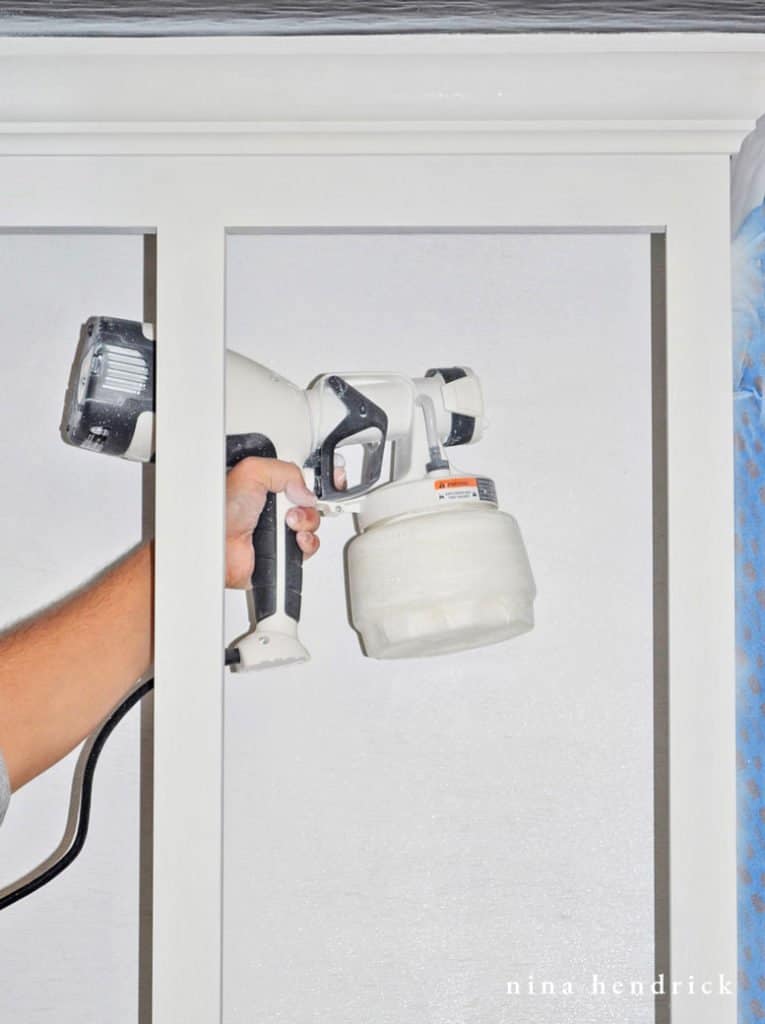
Footstep Eighteen: Set Upwards Doors and Drawers and Spray
The doors must be set up in an upright position for spraying. Nosotros created a "spray booth" of sorts in our basement by putting a drop fabric over our workbench and putting a slice of flake drywall behind it. We started with the backs and sprayed with the technique described in a higher place.
After allowing for drying time, we sprayed the second coat. We so flipped the doors and repeated the process with two coats. We then repeated the process on the drawers, opting to paint both the outside and interior. Your cabinet doors and drawers may end up requiring more than 2 coats- simply we feel that two is the minimum. After all of our priming, two coats were more than than enough for us!
Later on everything was dry, we rehung our doors and replaced our drawers. It was the moment of truth! I could have cried with happiness (but I'one thousand a little dramatic).
Quick Reference (and Printable) Painted Oak Cabinets Tutorial
You lot can impress the card below as a quick reference while y'all're completing the project, only brand sure to read the steps above for an in-depth explanation. If you honey this projection, delight don't forget to come dorsum and leave a five-star review!
Prep Fourth dimension three days
Active Time 2 days
Total Time 5 days
Materials
- Orbital Sander
- Step Ladder
- Shop-Vac with Brush Zipper
- 1 1/4" Putty Knife
- 3" Putty Pocketknife
- 2" Paint Castor
- Mini Roller Kit
- Paint Measuring Cup
- Paint Sprayer
- Air Compressor (optional— for spraying dust off cabinet doors and drawers)
- Caulking Gun (optional)
Tools
- Orbital Sander
- Stride Ladder
- Shop-Vac with Brush Attachment
- 1 1/4" Putty Knife
- 3" Putty Knife
- 2" Paint Brush
- Mini Roller Kit
- Pigment Measuring Cup
- Pigment Sprayer
- Air Compressor (optional— for spraying dust off chiffonier doors and drawers)
- Caulking Gun (optional)
Instructions
- Get together your tools and materials.
- Remove everything from your countertops, cabinets, and drawers. This is the perfect opportunity to declutter!
- Remove and number doors and drawers. Store any hardware you lot're saving in labeled plastic bags.
- Vacuum chiffonier boxes and degrease with TSP substitute.
- Remove all of the appliances if possible so you can requite the cabinets an all-over finish.
- Seal off all other surfaces with plastic sheets and painter'south tape to protect from overspray.
- Sand cabinet faces with lxxx grit sandpaper using your orbital sander attached to a shop vac to gather dust.
- Fill up in grain and other imperfections with a thin layer of Drydex spackle using a putty pocketknife.
- Sand with 220 dust sandpaper. Follow with a dry out tack material, removing all dust.
- Employ a mini roller and brush to prime the cabinets with an oil-based primer.
- Sand the primed cabinets by hand with a 320 dust sanding cake. Remove all resulting grit with a shop vac.
- Echo steps 10 and xi.
- Prep all of your drawers and cabinet doors for painting by cleaning with TSP substitute and repeating steps 7 through 12.
- (optional) Fill all cracks and particular with caulk.
- Prep your paint and paint sprayer with the correct dilution of distilled water.
- Test your paint sprayer to make sure at that place'due south no orange skin.
- Using your paint sprayer, paint your cabinet boxes with smooth and continuous strokes. Paint minor areas and tough angles first!
- Prepare doors and drawers in an upright position on plastic and spray. I recommend a minimum of ii coats.
Notes
You practise not need to sand again subsequently priming or use a topcoat.
Pin Information technology for Afterward
Have a question virtually this project?
Cheque the comments of this post below, equally there are more questions answered! You lot can besides visit the FAQs post here or meet how the cabinets held up after five years hither. For all of the kitchen details, you can visit this page!

Source: https://www.ninahendrick.com/how-to-paint-oak-cabinets/
Posted by: wilsonsqueseseen1989.blogspot.com
0 Response to "How To Strip Oil Painted Canvas"
Post a Comment